Learning DaVinci: Pros and Cons
The Pros and Cons of DaVinci Resolve
In today’s world, every stage of the video production process is crowded with a plethora of tools to choose from. What kind of camera should you use? How should you record audio? How should the scene be lit? And those are only some of the choices that must be made in pre-production. After recording, then all post-production decisions must be made. How should this piece start out? What should the audience be hearing while they’re watching this? How should the color of this piece look?
Perhaps the biggest post-production decision of all is what kind of editing program should be used? Normally, this isn’t one of the burning questions asked after every shoot because editors tend to stick to their favorite non-linear editing program every time. There are also quite a few options when it comes to Non-Linear Editing (NLEs). Some prefer Final Cut, some prefer AVID and others like myself prefer Adobe Premiere Pro.
Lately, though, there’s been a lot of buzz about a program that’s been climbing the ranks of NLEs. DaVinci Resolve has primarily been known throughout the industry as the preferred program for colorists, due to its superior capabilities of correcting and grading color. Having never really used the program before, we decided to see what the buzz was about and give it a try on a recap video that covered the 2019 NFL Draft event in Lock 3 this past April.
The following is my experience using DaVinci Resolve 16 through every phase of this project and what I’ve learned along the way. In no way is this a comprehensive summary of everything the program can do, but I hope it will inform you on what some of the positives and negatives were for me while using the program. I tried to be as objective as possible and keep an open mind throughout, so that I wouldn’t blame DaVinci for not being something that I’m already familiar with. I’ve also assigned ratings to each category based on how I think it stacks up to other NLEs out there, but also how it would compare to what I would consider the “perfect” editing program.
General Layout: 8/10
Pros: My first impression of the layout for the entire program was that it was a similar set up to what Premiere Pro does with workspaces. I soon realized that this was not the case, as unlike Premiere, DaVinci allows only certain windows and specific tools to be usable only when in certain tabs of the program. Some might consider this inferior to Premiere’s ability to display any window no matter the workspace, but to me it’s a nice feature that keeps you organized and moving through each step pretty seamlessly. Cons: Not much to dislike about their clean and modern looking layout. I’d describe it as a nice mix between the simple Final Cut effects parameter adjusting with a Premiere style timeline. The lack of an ability to swap window positions is something that could be implemented to make the program a bit more customizable when working in dual screen mode.
Compiling Footage: 7.5/10
Pros: DaVinci’s bin structure is almost the exact same as Premiere’s with a few exceptions. In both you can create bins to sort your footage, but DaVinci offers up what it refers to as smart bins. These bins will automatically store items based on information that is plugged in to metadata. In other words, all you have to do is keyword the footage clips based on what they contain and they’ll be placed into a corresponding bin automatically. This would be especially helpful if you had a lot of footage to go through in a short period of time and didn’t want to go through the process of sub-clipping or renaming. Also, DaVinci features a “facial recognition” feature that, while I’ve yet to try to its full capacity, proved to be pretty amazing in the NFL Draft project. This feature will comb through all of the footage and try to identify and sort based on what it defines as the same face. This would be a huge time saver if you had multiple camera angles for interviews or multiple b-roll clips featuring the same people. The program does get pretty confused when there are multiple faces shown though. Cons: I mentioned sub-clipping in the pro section above, but overall I was a bit disappointed with how sub-clipping works in DaVinci. Creating a sub-clip is simple enough and functions as it should, but once you place a sub-clip in a timeline and try to extend beyond those in and out points, you’ll realize that you can’t do it very easily. Instead of being able to roll edit to access more of the clip, the only way to extend is by adjusting numeric values of the clips duration. This would work if you knew that you wanted exactly three more seconds on the tail end of a clip, but in a situation where you’d like to preview the clip during the extension to see where a good visual ending would be, you’re going to struggle.
Editing: 7/10
Pros: The editing workflow is another aspect that seemed very similar to Premiere, but again offered some features with added benefits. The overwrite, replace and insert abilities that are built into the program’s panel provide for quickly placing footage exactly where it’s needed no matter the stage in the assembly process. Also, once you know what action to use and familiarize yourself with the shortcuts you can work super efficiently. Cons: The timeline and program panels look simple, but when just starting out in the program they aren’t as intuitive as you might think. It took me a while of trial and error while also working through tutorials to fully understand the difference between the regular trim tool and the dynamic trim tool.
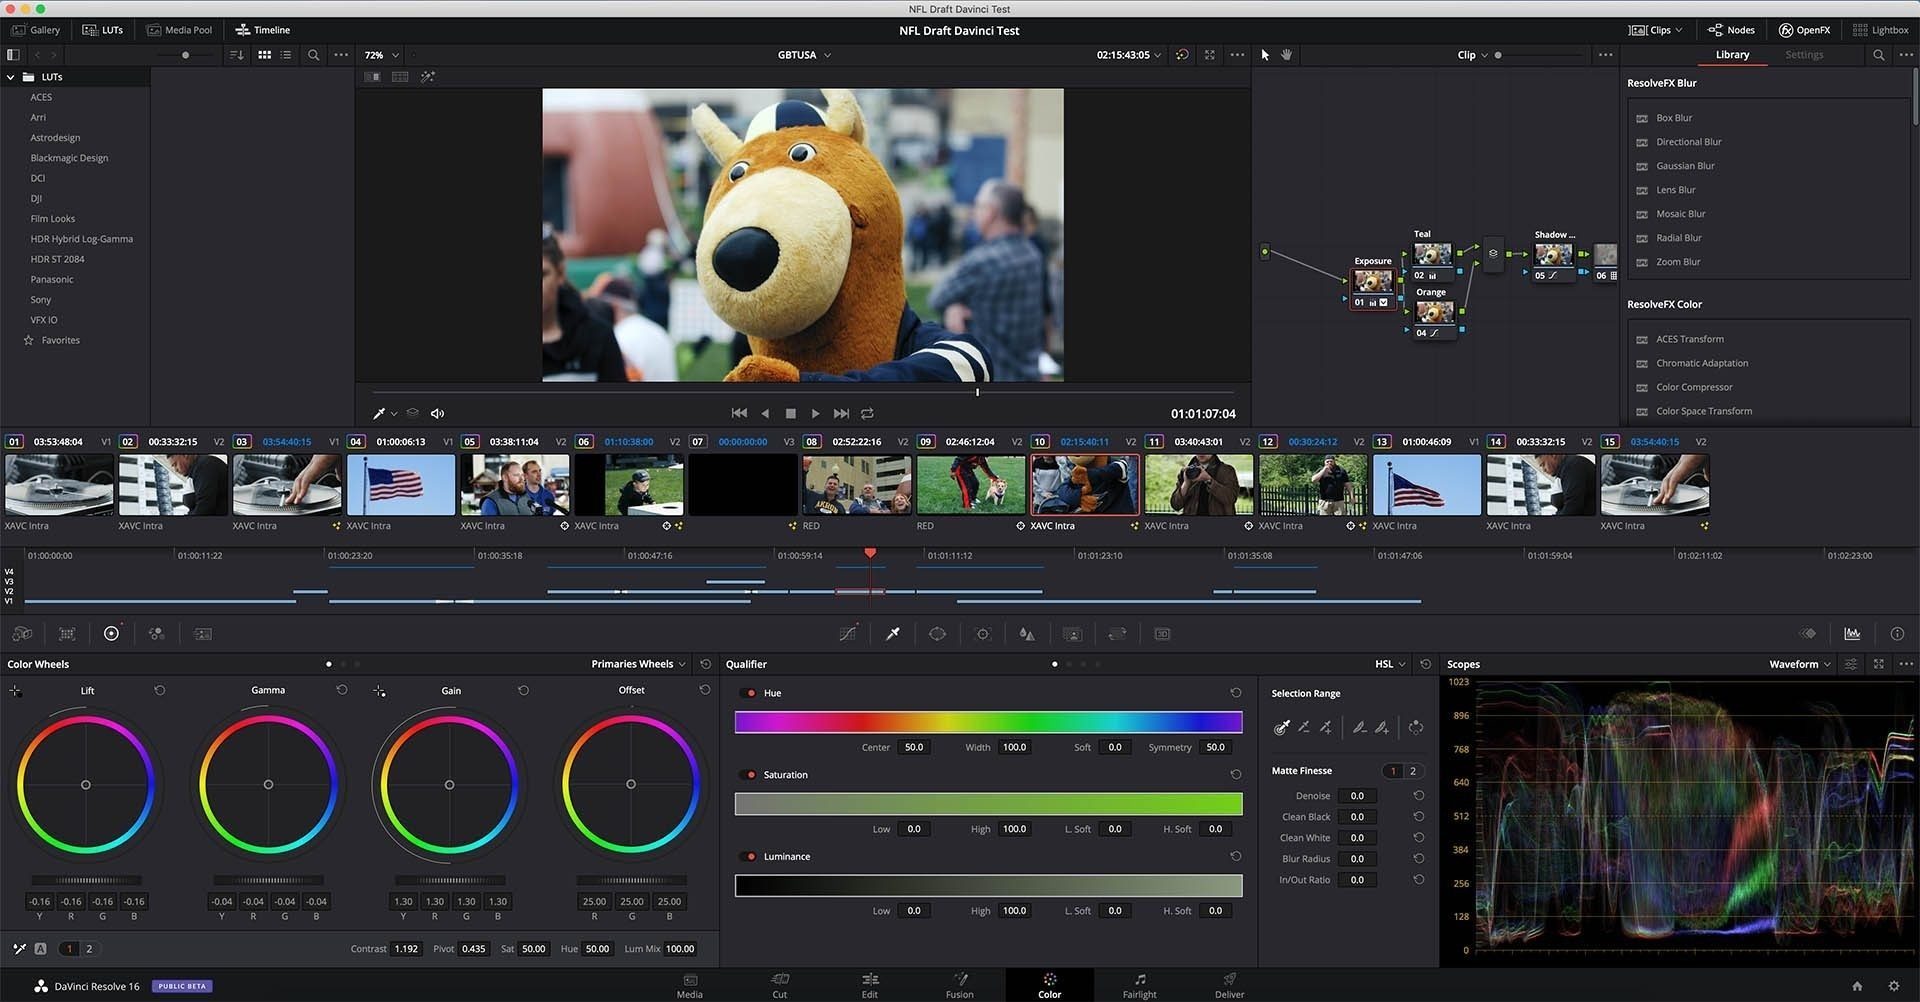
Color Correcting: 10/10
Pros: As I mentioned earlier, DaVinci originally gained its popularity from how great it was at editing the color of footage. Therefore, it may not come as a surprise when I say that this is my favorite part of the program. Having mostly edited color for video using the Lumetri Color effects in Premiere and After Effects, it took me a while to get used to editing with their node system. Once I got used to it though it made the whole process of color correcting and grading easier, and actually pretty fun to work with. My absolute favorite aspects are the Hue vs. Hue, Hue vs. Sat and Lum vs. Sat curves. With these tools I could pluck whatever specific color that was in my footage and immediately adjust whatever I wanted to that color only. When I wanted to narrow my adjustments down even more I would incorporate the program’s HSL (Hue, Saturation, Luminance) system or masking and tracking. I was blown away by the precision and immediate responsiveness of both of these systems and would say that they’re miles ahead of what Premiere has to offer. 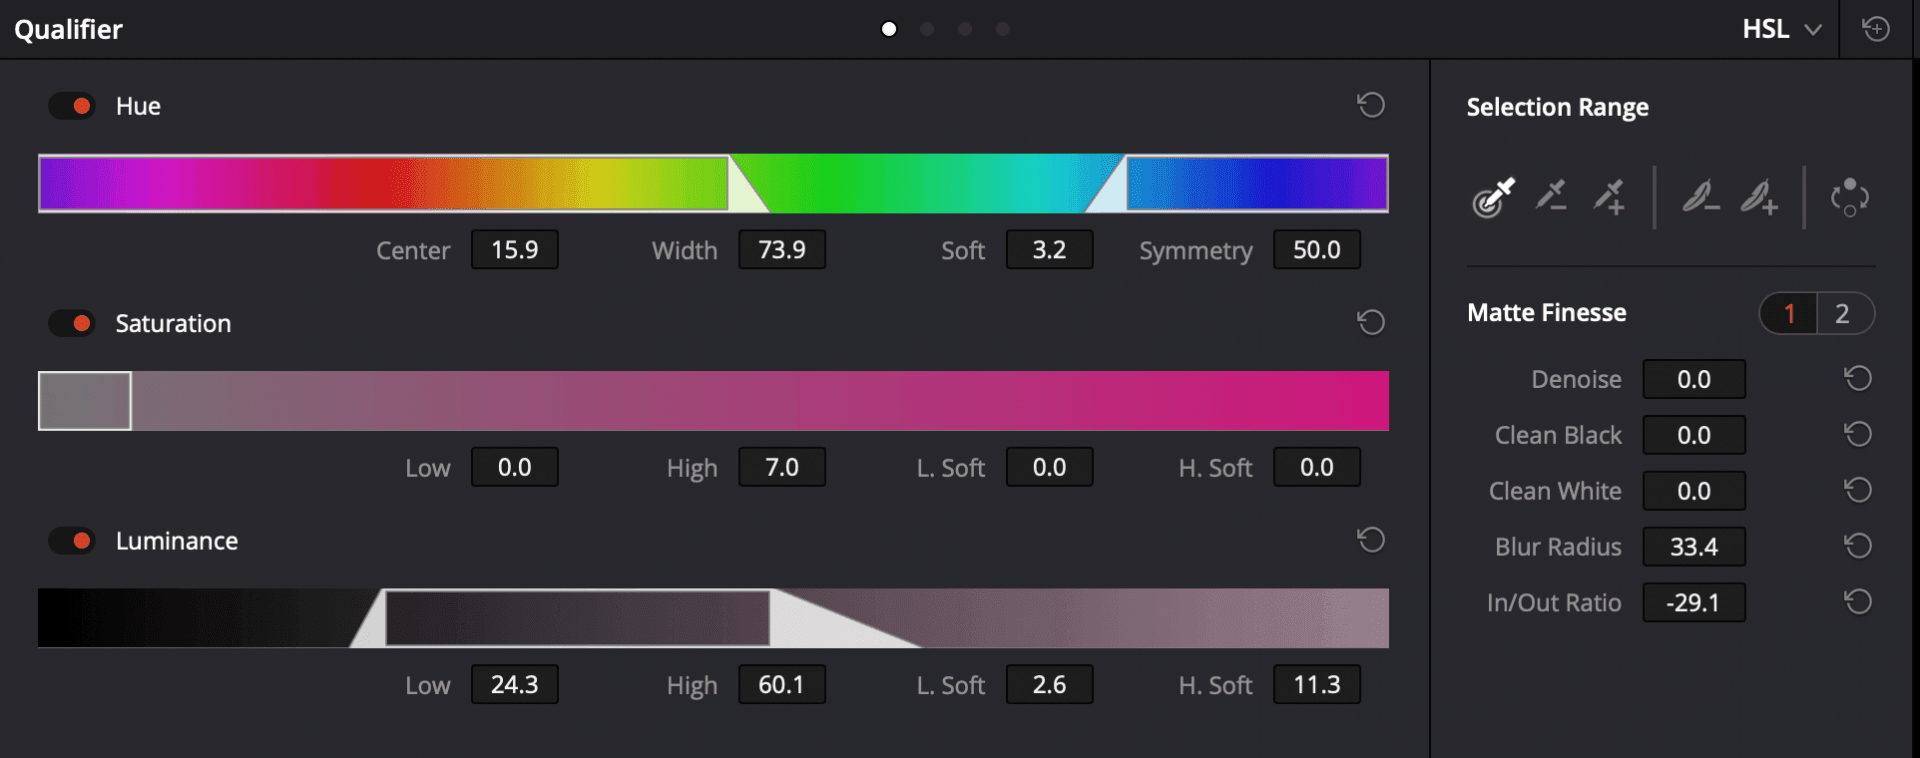 Cons: The one thing that I would knock the color editing for is that all of the masking seems to take place either in the color panel or in the motion graphic tab. I really wish that it was also the editing panel, as there are times when it’s most helpful to mask out a clip while you’re also viewing the clip directly underneath it.
Motion Graphics: 2/10
Cons: Just as color was my absolute favorite part of DaVinci, the motion graphics portion of the program, named Fusion, is my least favorite. I’m going to start with the cons on this one for that reason. My biggest complaint is that the node system that works so well for color seems to be both extremely confusing and tedious in Fusion. I understand that there’s a learning curve, but to me there’s no way to even grasp the basics of Fusion without a few hours of tutorials. And even then, once I sort of knew what I was doing I felt that everything could have been accomplished easier and faster in Adobe After Effects. Pros: Maybe Fusion would be better at specific effects with their particle and 3D environmental effects, but it still would feel like a very labor intensive task.
Audio Editing: 8.5/10
Pros: A built-in audio editing program called Fairlight means this program can edit audio tracks and add effects without having to leave the editing program. This saves time and organization especially compared to using Premiere and Audition, then round-tripping back to premiere. I wasn’t able to extensively try out each effect, but the interface in this program is pretty easy to navigate. You can actually view a window of the video so that you can edit what you hear while you’re viewing what you’ll see. Cons: The audio editing is near perfect with one exception: when key framing audio, it’s close to impossible to precisely move keyframes up and down to exactly where you want them. I’m not sure why this is, but I would really struggle to precisely place where I’d like a keyframe and would often end up overshooting it.
Exporting: 9.5/10
Pros: The delivery workspace is one of the simplest elements of the program, but still mind-blowingly effective. I never had an export that took longer than five minutes, which is astounding when compared to exporting in any Adobe program. Any editor will tell you that a faster export time can make all the difference because it means that you can review your projects immediately then jump on making corrections if they’re needed. Cons: I kept getting frustrated when I would begin a new export after corrections because your in and out points don’t carry over from the main edit workspace. Each time I would choose the settings for the output file and hit render, then realize that my in and out points had been set to include every clip in the timeline. This might be fine for some editors, but was really throwing a wrench into my process where I like to place extra b-roll options well after the final clip in my project. I then would have to cancel the render, adjust the in and out points then render again. Overall, it wasn’t all that time consuming and perhaps there was a project setting that I should have changed. Regardless, I found it to be an annoyance, but still worth the speed that came when exporting.
DaVinci Resolve X-factor
A feature that I wasn’t able to explicitly categorize, is DaVinci Resolve’s collaboration. We were able to test out collaboration in this project with our production specialist, Josh Kuss, jumping in to help with some color correcting while I was editing. The process worked just as you would hope with a few exceptions of what I would consider to be bugs caused by Resolve 16 still being in beta. The collaboration ability alone would pay for itself if you were a production team that has to turn projects around in a matter of days. You could potentially put one person on footage organization, one on editing, one on color and one on audio. You could also have one person working on motion graphics in Fusion or another program of their choosing then importing those files. With all of those tasks being done at once, production time could be cut down significantly.
Conclusion
All in all, I’d say I was very pleased with how DaVinci works. Clearly their team is focused on making a program that’s easy to look at, easy to work with (except for motion graphics) and fast. Their collaboration is maybe one of the biggest game changers with just how efficient it could make a team. I know the tracking, masking and color correcting will make it hard to go back to other programs that just aren’t as fast and responsive.
That being said, I do hesitate to make this my go-to editing program. Perhaps part of the reason is that I’m so used to using Premiere, but I do feel like it’s a lot faster and easier to be precise when putting together a timeline. I would use DaVinci over Premiere only in a project where collaboration and color correcting are crucial and motion graphics are not needed. In an ideal world, a program would exist with DaVinci’s collaboration and smart bins, Premiere’s timeline editing, After Effects’ motion graphics, either Audition or Fairlight’s audio editing and DaVinci’s rendering.
Until this perfect Frankenstein’s monster of a program exists, I’ll just have to keep using each program for a project that best fits, and hope for continued improvements in updates. If you would be interested in trying out DaVinci Resolve on your own, I highly recommend working through one of Blackmagic Design’s Definitive Guide Books. Between this book and YouTube channels like JayAreTV, Learn DaVinci Resolve, Casey Faris and Goat’s Eye View, I was able to answer a lot of questions that I ran into and become comfortable working in this program.
Check Out the Finished NFL Draft Even Recap Video Created in DaVinci Here.